by noah | Mar 17, 2021 | Database, MS Access
 A program like Microsoft Access makes it easy to build a database that is fast and optimized. You can choose from the available templates or create your own. If you use a template, all you need to do is plug in your information and voila! If your needs are more complex, you can hire a database expert like Arwkare to build a personalized database.
However what happens when you’ve already paid someone to build your database and they didn’t do an adequate job? Unfortunately, this happens. If your database isn’t running as well as it should, it’s possible that it has a poor design with one or more of these practices.
Poor Normalization
Database normalization is the process of structuring a database to avoid redundant or duplicate information. Unfortunately, some databases are designed on the fly without following the rules of normalization.
At the very least, all databases should be normalized to third normal form. With this setup, each column of a table will be dependent on the primary identifier. If your database doesn’t comply with first, second or third normal form, consider redesigning these tables. We promise – it will pay off in the long run!
Improper Naming
We’re not going to get into the details on how to best name things as this is a topic in itself. What we want to stress is the need for consistency. The names you choose for your database are not just for identifying objects but also to allow future programmers, users, etc. to quickly and easily understand your database. In other words, no one should have to read an exhaustive manual to find out what a name means.
Lack of Documentation
When you carefully name your objects, columns and so forth, it makes it clear to everyone what your database is modeling. Follow a consistent naming standard as well as definitions on tables, columns, relationships and default and check constraints. Poor design tends to have a lack of documentation, and this makes it difficult for users to understand your database.
Not Using Stored Procedures
Stored procedures refer to SQL code that is saved to be used over and over again. While procedures might take a bit more effort at first, they’re worth it in the long run. Stored procedures offer the following advantages:
- Quick response times because the procedures are created and stored
- Option to group all the required SQL statements in a procedure and execute them at once
- Avoid repetition of code
- Use additional SQL functionalities
- Use the code in any number of applications
Lack of Testing
When it comes to testing, we recommend having a strict testing plan in place. This plan should go through every part of the development process to identify bugs and diagnose and fix problems that would otherwise lead to corruption. Good databases are frequently tested and end up running optimally because of it.
The best way to ensure a functional, efficient database design is by working with the right team of database development experts. Arkware has decades of experience building, repairing and optimizing databases and we always follow the best practices. Contact us today to discuss your database needs.
by John Campbell | Mar 11, 2021 | MS Access
In our previous blog, we highlighted some tips and tricks within Microsoft Access. In this article, we highlight some additional tips and tricks when using Access forms. The below features are available in Access 2016 and higher.
Viewing a form in Layout View
When using Access forms, the user tends to either be in the “Form View” or “Design View”. The design view allows for physical layout changes of the form. The form view is primarily used to enter data or run reports via command buttons.
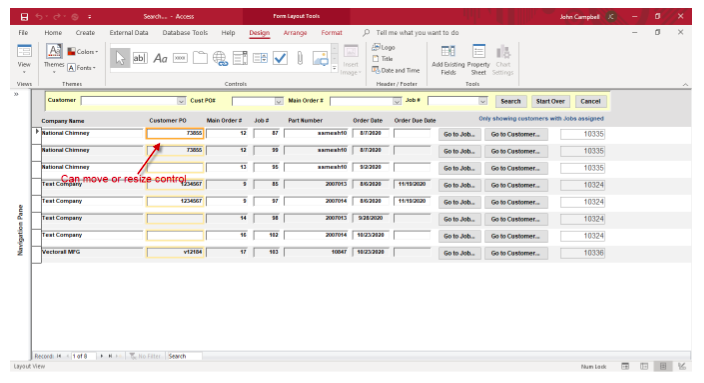
However, there is another viewing option within Access called the “Layout View”. The layout view is only available for use with tabular forms. The tabular view is a combination of design and form view. As noted in Figure 1, a nice option is that the user can select a form control while seeing the actual data. The user can then resize or move a control while viewing actual live data. This saves time by not having to keep switching between the form view and design view.
Figure 1
Conditional Formatting Option
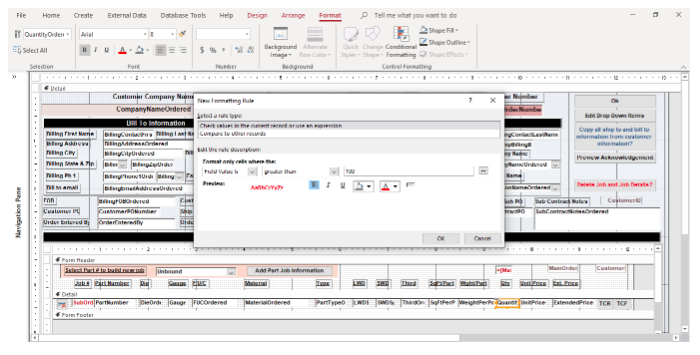
Conditional formatting is often dominated in use in Microsoft Excel. However, Microsoft Access also has this feature within Access forms and reports. The idea behind conditional formatting is that a field or fields meets some condition(s) and then some sort of formatting can be done on the control.
For example, in Figure 2, if the quantity field in the form is greater than 100, the control color would be set to bold with the color red. Another option, and there are several, is if the field has the focus on the form, the background color can be changed to a certain background color. This condition is beneficial when tabbing through a form to know which field has the focus.
Figure 2
Setting the Default Formatting for a Specific Control
Changing form control formatting can be time consuming. When creating form after form, you may tend to use the same formatting features. Access has default settings, but these are set at the program level. Altering the field properties may involve making many changes to that specific control. Having to do this repeatedly, can be time consuming if the form has several controls to change.
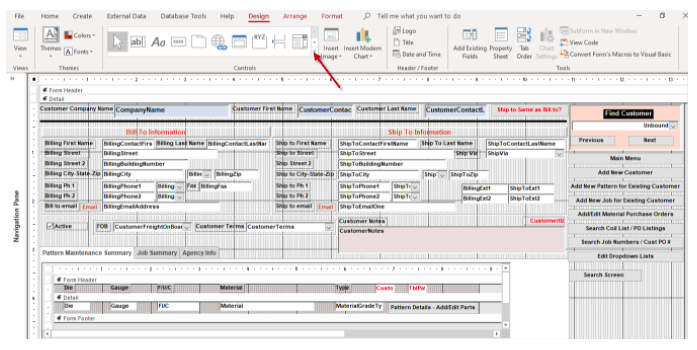
An option buried in the formatting bar as noted in Figure 3 is the “Set Control Defaults” option. The process to use this feature is first formatting a control to the way the user wants it to look. For example, you may want to have a field that has the sunken affect, using the arial font and is bold.
Once the control is formatted the way the user desires, select the control and then select the “Set Control Defaults” option. Then, going forward all field controls that are added to the form are then formatted in the with the same features, reducing the steps of formatting itself.
Figure 3
These are just a few time saving tips when using Access Forms. If you are having trouble knowing how to get started with Microsoft Access, reach out to Arkware today for any database needs.
by noah | Feb 25, 2021 | Database, MS Access
 Is your Microsoft Access database giving you problems? If your database has become corrupt, is having trouble opening or is prone to errors, rest assured that there are ways to get back on track with an efficient, reliable database.
The Arkware team has extensive experience recovering MS Access databases. We’ve recovered many databases for our customers and can likely do the same for you! We have some tips to help you recover your database on your own, but if you’re unsuccessful, give us a call and we’ll be happy to assist.
What Causes Database Corruption?
Despite all of the advantages to Microsoft Access, it’s not uncommon for databases to become corrupted. This means that you could lose or damage data at any point in time. The most common causes of lost or damaged database files are:
- Hardware failure
- Improper shutdown
- Virus infection
- Interruption in changing data
- Third-party plugins
- Software bugs
Ways to Fix a Corrupted Database
Digital assets can get corrupted over time, so there are a number of ways to deal with this headache. It’s important to know your options because you can’t use just any tools. It all depends on the reason for the corruption, if you have a backup saved and how comfortable you are at recovery.
Here are some of the most common ways to repair a corrupted Access database:
- Access your backups. The best way to secure yourself against database loss is to create a backup copy. This way, you can restore all of your lost data in one simple step. To do this, open your database, go to the File tab, hit Save As and choose Save Database As >> Backup Database >> Save As.
- Compact and repair tool. You can also use the Compact and Repair tool to compress your database and restore damaged files. Go to the File tab and choose Compact Repair Database. This is a built-in feature of Access.
- Use a professional tool. You can also try a professional tool to repair a corrupt database. Many companies offer them, though not all are created equal. And, because you have to pay for these tools, you don’t want to invest in something that doesn’t work. Contact Arkware for a list of approved tools to help with database repair.
If your database isn’t working the way it should, it’s possible that it’s corrupted and needs to be repaired. These tools are effective, but it helps to know what’s wrong with your database in the first place. To have your database analyzed and repaired, contact Arkware today.
by Jim Ebsen | Feb 1, 2021 | Database, MS Access
Where do I Start?
A general rule for creating a database (or a database feature) is to envision the minimum solution needed to satisfy the goal. Keeping it simple applies especially to beginners. If you want to build a system for Tracking Sales Leads, don’t add in building a Customer Service database or Billing System at the same time. Then, once your new application is working well, you can add new features and integrate other business aspects into the design.
Before you start, it is good practice to plan out your development so you can always envision your goals and avoid unnecessary hurdles. Getting your team members involved will also help to define the project as well as increase buy-in to use of a new system.
MS Access database designs should always begin with some simple concepts related to your organization:
1. Define the Goals
What challenge(s) will the database resolve?
- How will the organization benefit? i.e., streamlining process, enforcing strict paths of work, single source recordkeeping
- How will the users benefit? i.e., organized data, quicker retrieval of data, less redundant data entry
- How will the customers benefit? i.e., comprehensive/consistent reporting, faster customer service, better tracking of history
2. Define the Workflows on Paper
- Write down the steps necessary in your ideal workflow. For example, in a system for Tracking Sales Leads, write down the full list of the ideal steps from a sales lead all the way through to closing a sale. There may be exceptions to the ideal path that need to be addressed. It is often a good idea to address these exceptions once the new system is proven to work well for a majority of the cases.
3. Design Tables and Data Fields on paper
- Tables are the building blocks of the database and should include all the data you are hoping to manage in your new system. Typically, all the data points that are included in your forms and reports will be represented in a field within a table. In a Sales Lead Tracking database, you might include tables and fields such as:
-
-
- Organization – Including Organization Name, Address, Address2, City, State, Zip, Phone, etc.
- Contact – Including First Name, Last Name, Phone, Email, etc.
- Lead Source – Including Source Name, etc.
- Lead Status – Including Status, etc.
- Lead Details – Date of Lead, Product or Service of Interest, Notes, etc.
- Team Member – Initials, First Name, Last Name, etc.
4. Design Forms and Reports on Paper
- Your forms and reports are going to be your gateways to putting data into the system, managing the data that is in the system and pulling data out of the system. Gather all the applicable forms and reports that you already use or sketch up the ones you will need. Ensure that all your essential data is captured on these documents.
In our next article, we will discuss how to create your tables in MS Access.
by John Campbell | Jan 19, 2021 | MS Access
All programs seem to have some sort of time saving tips or special shortcuts and Microsoft Access is no exception. The casual user may not be aware of many of these tips, so at Arkware, we have shared a few query tips and tricks.
Top Values Setting
When in the design of any query, there is a setting to filter out the top records. The top values setting provides several different options. One option is to return a certain percentage of data. If you want to know the top 25% of your highest price orders, you just select the 25% option from the list. The important part of this feature is to always have the data in the proper sort order. The drop-down list has some pre-defined choices, but it allows any values entered.
Zoom Box
It is often difficult to see everything in any part of a query when typing in the criteria or field name area. A keyboard shortcut of “Shift + F2” will bring up the zoom box. The zoom box allows you to see everything in one separate window.
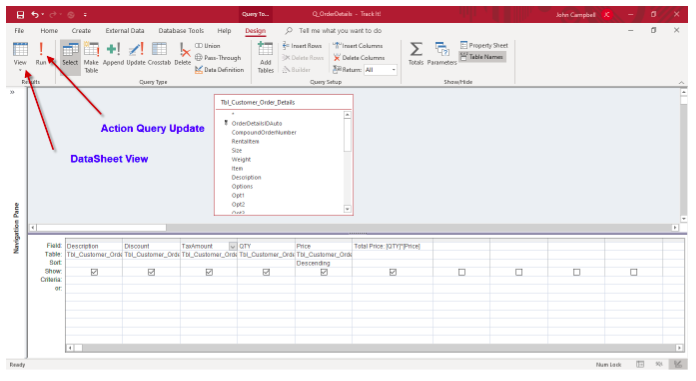
Datasheet View button versus Run Button
When creating a standard query, there are two choices to see the query results. You can select either the datasheet button or the run button. However, when creating action queries (queries that perform action on records), using the run button will carry out the query. Before you run a delete or update query using the run button, you may want to see what or how many records are going to be updated or changed. Selecting the datasheet button will allow you to do this. Once you are confident of what records will be updated, then the run or action query button can be used.
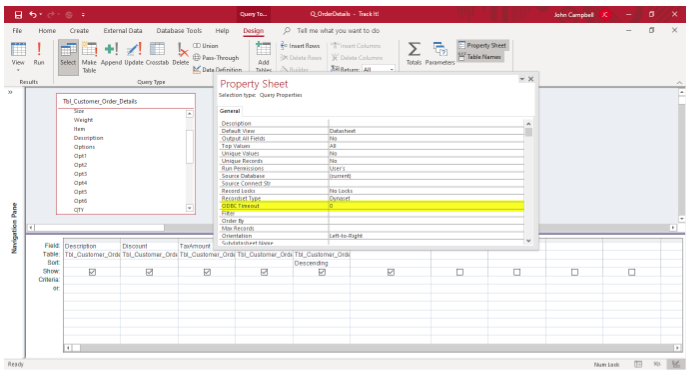
ODBC Timeout Setting
Microsoft Access allows you to connect to other data sources such as a SQL Server database. Depending on the design of the SQL Server database and the number of records that are retrieved, it can take some time to retrieve those records.
The default ODBC (ODBC stands for “Object Database Connectivity) timeout setting is 60 seconds. This is the time it will take for the query to return data results. If it takes longer, the user will receive a time out error. A tip for this setting is to enter the value of zero in the setting. By entering a zero, the time out is set to unlimited. This means the user will not see a timeout error if it takes longer.
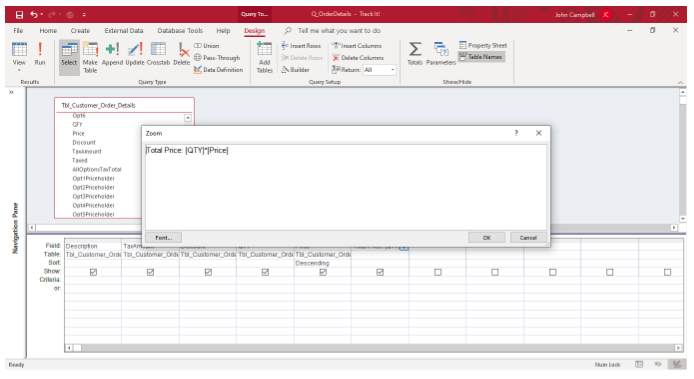
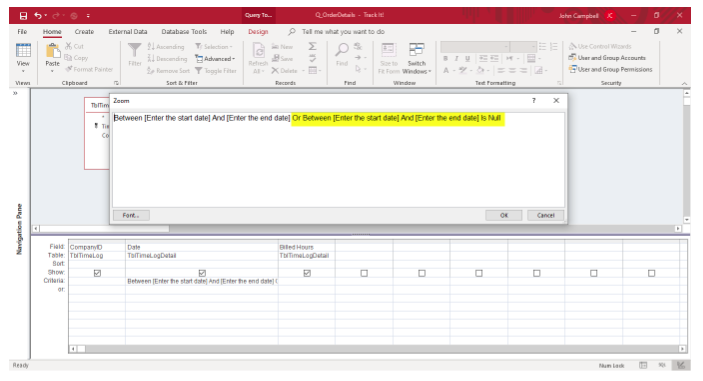
Parameter Query Setting
Microsoft Access offers many options for entering query criteria. One option is the parameter query option. This option prompts the user for specific data input. For example, you can have the option prompt for a specific data range by using the Between [Enter the start date] And [Enter the end date].
Sometimes you want to see all the records for a specific situation. For example, if you do not know the starting or ending dates for example, you may be excluding some records.
The tip for this feature is to add a statement at the end of the criteria. As noted below, the way to use this feature is once the query prompts the user to enter the date range, but not entering a date for the start and end date prompts, it will return all the records from the select query, and in this case all dates.
Hopefully, these tips will help you in your work with Microsoft Access. If you need help with your project or do not know where to begin in the design of any database, please reach out to Arkware for assistance.
by noah | Sep 30, 2020 | Database, MS Access
Customer relationship management (CRM) software keeps all customer interactions in one place. CRMs have evolved significantly over the last few years because they are effective at streamlining communications, improving customer satisfaction and retaining loyal customers. Some CRMs are expensive, but yours doesn’t have to be. With Microsoft Access, you can access the built-in CRM database template. Below we’ll show you how.
Features of Microsoft Access CRM Template
Microsoft Access has a great selection of templates that you can download and work off of, but be aware that not all may meet your needs. In this case, it’s best to hire a company like Arkware to build a custom database for your business or organization. This way, you’ll have everything you need to keep track of your customers in one place.
Here are some of the features that an MS Access CRM template will include:
- Account/client information
- Contact information
- Potential sales opportunities
- Activities (phone calls, appointments, emails, etc.)
- Invoices
How to Make Your Own CRM in Access
Below are the steps to creating your own CRM using Microsoft Access.
- Step 1. Open Access and locate the template gallery. To find the CRM, select “File” and “New.” Here you will see all of the available databases. Download the sales contact management database. It’s included under the “business” templates.
- Step 2. Review the template. Make sure it meets your needs. To view the full database, press F11. This lets you view the tables, queries, forms, reports, macros and modules.
- Step 3. Modify the tables and forms to meet your needs. This may require you to edit field properties of the tables and forms. Fortunately, MS Access is fairly easy to work in – no coding experience necessary!
- Step 4. Review the relationships between tables. If necessary, modify them to fit your needs.
- Step 5. Enter your data into the tables and forms. You can do this manually or by inputting data directly from Access.
- Step 6. Run your queries. If the template does not contain queries, use the query wizard to create them.
What if You Can’t Find the Right CRM Template?
The selection of client tools in Access is limited, so it’s possible that you may not be able to use the built-in CRM template for your business. If this is the case, contact Arkware for a customized solution. We can build you a personalized CRM that fits your unique needs and budget!