by John Campbell | Apr 14, 2022 | Database, MS Access
Continuing our series of Tips – Tricks & Guidelines with Microsoft Access we share some additional items. The ongoing articles will continue to focus on tables within an Access database.
Database Tables and Table Relationships
What exactly are database table relationships and why would you want to use them? Designing a database with multiple tables can be particularly challenging. Not only do you have to determine all the database tables but understanding the concept of a database as far as multiple tables is a difficult undertaking.
Some people just give up on trying to do this, and quickly gravitate to MS Excel. Before long, they find themselves in a spreadsheet nightmare of having multiple spreadsheets linked together across the great chasm of a shared network. Individuals navigate to Excel, because they do not have the time or knowledge to build an Access database.
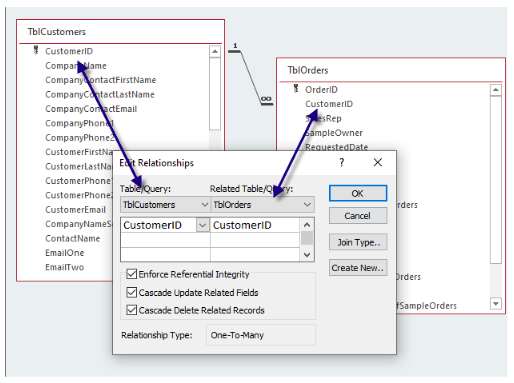
So, assuming you want to build a database in Access, then the table relationship window in Access can be extremely helpful. My professional opinion is don’t create anything in your database until you can map out all relationships using this feature. In the below figure, we see a standard relationship between a customer and an order.
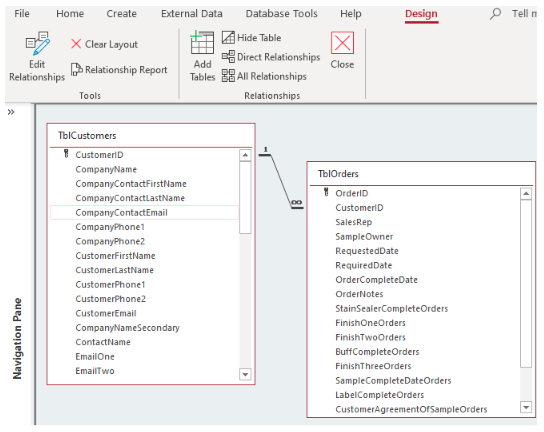
This article will focus on the “one to many” relationship. What does this relationship mean and how is it used? In the above example, the customer information is stored as the “one” relationship and the orders are stored as the “many” relationship. Why would you want to store the customer information more than once? The orders or many side will only store the CustomerID more than once because a customer can order more than once.
For example, if a driveway sealcoat company blacktops your driveway. In this case, the customer is stored in the customer table and all the seal coat/order details will be stored in the orders table.
Two years from the first sealcoat, the driveway will need to be resealed again. The customer is already in the database, so a new order is created for the same customer. In the below form view of the orders shows the final development once the tables are created.
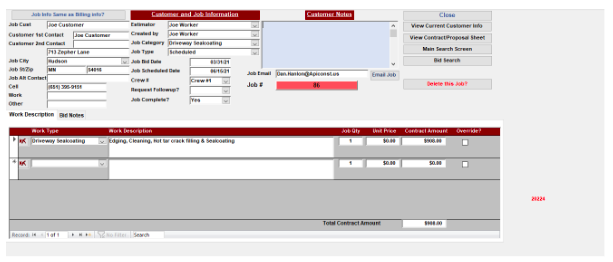
In the above example, the customer job information is the primary component of the one-to-many relationship. If a new job is needed for the same customer, all the user does is select the new job button in the below diagram.
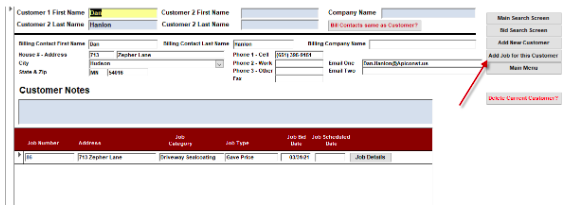
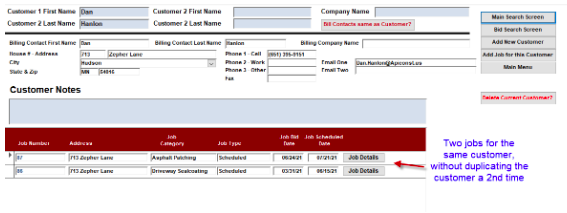
Once the new job is added, then the customer summary screen changes to reflect the 2nd job for the same customer. See the below diagram.
So this takes us back to the table relationships, but also bridges the gap to why you setup relationships in the first place.
The above figure is the outcome of creating the tables and forms. The below figure is where it started when you are setting up the table relationships to begin with. The CustomerID in the customers table matches to an order in the Orders table.
Tip – Never begin to create any database entry forms in an Access database until you have mapped out all the table structure first.
The secondary items in the below diagram include the following:
- Enforce Referential Integrity – An order cannot be entered into the orders table until that said customer is created first. This prevents “lost” orders being created without a customer.
- Cascade Updated Related Fields – If the customer ID field value changes in the customer table, all associated customer ID values will also change in the orders table. This is more prevalent in a database that has product numbers or employee id values changing.
- Cascade Delete Related Records – If you delete a customer, all associated orders will also be deleted. Again, this prevents “lost” or “Orphaned” records from being left alone in the downstream tables.
In summary, designing a database with multiple tables is not an easy task. However, it is possible with a great deal of research and hard work, it can be done. It’s really a puzzle that you solve, and all the pieces are right in front of you when it comes to tracking the data within your day-to-day processes.
If you are having trouble knowing how to get started with Microsoft Access, reach out to Arkware today for any database needs.
by John Campbell | Mar 25, 2022 | MS Access
Continuing our series of Tips – Tricks & Guidelines with Microsoft Access we share some additional items. The ongoing articles will continue to focus on tables within an Access database.
Viewing data within an Access database can come in many methods. Database forms are generally used to view and edit data. However, Access has several options within an Access table for those who are used to viewing data in Excel with a similar feel and look.
Many of these options are found under one menu when you have a particular Access table open. We’ll be highlighting a few of these in this month’s article. See below figure.
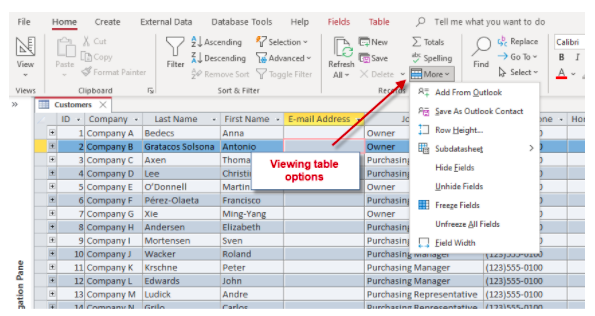
One option under the “More” dropdown list is the option to freeze columns. The user is allowed to freeze or lock in place one or more columns. This is useful when the table is open so that you don’t forget or lose track of what record you are looking at. In the above figure, you may want to always view the Company Name, First & Last Name for example. To do this, just click and drag starting on the column headings > click the “More” option as noted > select Freeze fields. Once completed, the user is then able to navigate from left to right and see all the company information while locking the contact information.
A second option that eases viewing is the ability to see the entire field name by widening the column headings. The user is allowed to highlight a column and then select the Field Width option. A dialog box then appears. See below figure.
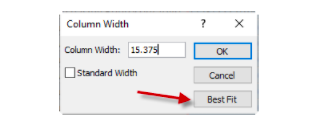
The best option at this point is to select “Best Fit”. This will adjust the column width to the widest item in the column you are selecting.
Tip – Instead of doing the above manually, the user is also allowed to > Click and drag to highlight all columns > then double click between one of the columns.
This will then adjust all the columns in the table to the “Best Fit” option.
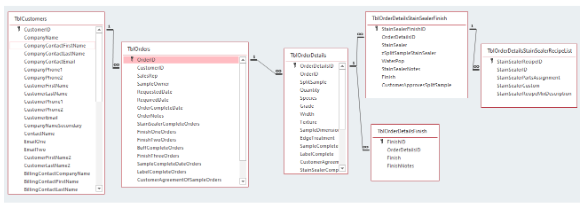
Another option in viewing the table data is to also view the associated linked tables where a table relationship is setup between one or more tables. This relationship is performed by using the Relationship option under the Database Tools main menu. This must be done prior to viewing table relationships within the actual table. See below figure.
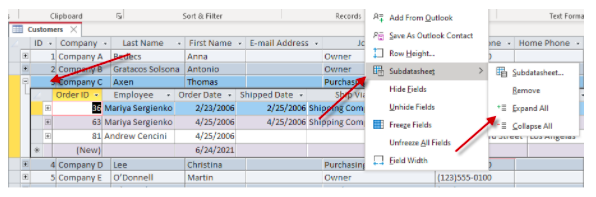
In the above example, the end user can see the actual order history for a particular customer. There may additional be additional tables as well. As long as the “+” sign appears in the datasheet mode, then the case of more related tables still stands to be true.
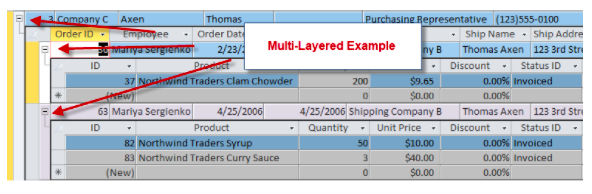
See below figure for multi-table example:
Once you have made any layout changes to a table and you then close the table, a dialog box will appear as noted in the below figure:
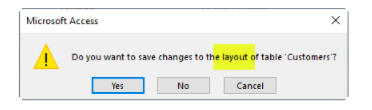
Please note that anytime a record is updated in a database and the table or form or lost focus of the record occurs, this saves that data in that record. The above message is asking to save the layout of your table. If you have made any column or appearance changes, these must be save when you close out of the table.
These are just a few time saving tips when using Access tables. If you are having trouble knowing how to get started with Microsoft Access, reach out to Arkware today for any database needs.
by John Campbell | Dec 28, 2021 | MS Access
Continuing our series of Tips – Tricks & Guidelines with Microsoft Access we share some additional items for the month. The ongoing articles will continue to focus on the tables within an Access database.
Filtering within a table
When querying for information in an Access database, the first thing that comes to mind are Queries and Reports. However, if you need some basic information or want to get a quick glance to some specific data, the user can gather the information with the table view through filters on the table.
For example, what if you simply want to know orders from 2 specific states. While the table is open, simply right click in the field you want to filter > right click > select Text Filters and then enter the states or items you want to filter for. See the below figure.
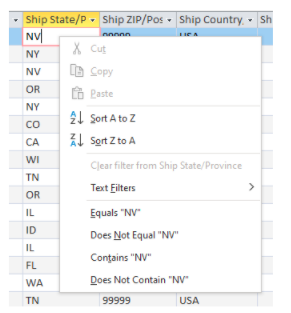
Once an item is selected, the results then appear in the table.
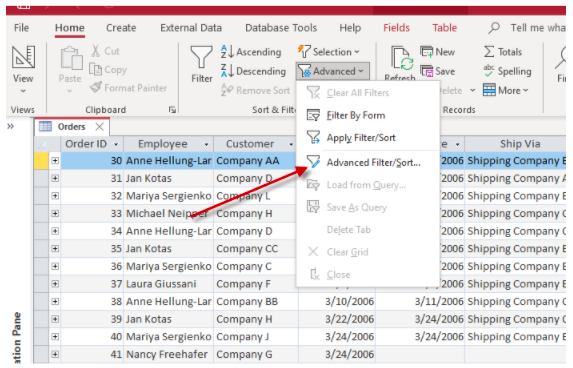
Tip – Sometimes, the filtered data is something that you may do on an ongoing basis. Another option on the tool bar is the Advanced Filter/Sort. See the below diagram.
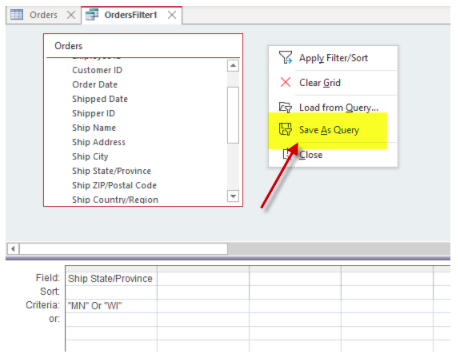
When selecting this option, the user is sent into what looks like the design of an Access query. At this point, there are many options, but for the purpose of this article, you now have the option of what started as a quick filter to save the filter as a query. Simply right click on the query grid and select “Save as Query” See the below diagram.
Now you have saved a basic filter which can be used again as a query in the database for future reference.
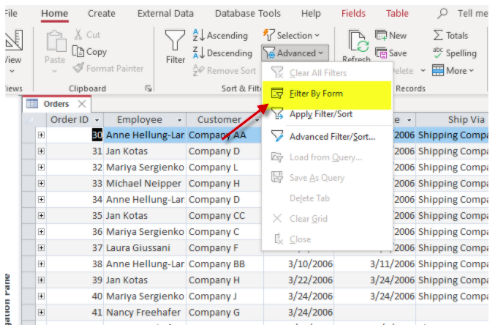
Another option for filtering while in a table is the option to “filter by form”. Again, this is used mainly as a very basic method to search for data within a table quickly and easily. See the below diagram.
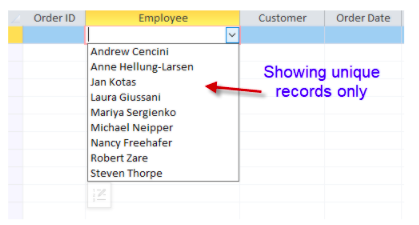
Once the filter by form is initiated, then all the records in the table disappear and then each of the fields will show drop down lists on all the fields. Once the dropdown is selected, then it will show the unique values for each column or field. See the below diagram.
Select the item you want to filter for and then those records will be displayed. If more advanced methods or querying are needed, then a select query would most likely be utilized. Additionally, if the table has more than 100K records, then for better performance a standard Access query would be a better choice.
These are just a few time saving tips when using Access tables. If you are having trouble knowing how to get started with Microsoft Access, reach out to Arkware today for any database needs.
by John Campbell | Oct 29, 2021 | Uncategorized
Continuing our series of Tips – Tricks and Guidelines with Microsoft Access shares some additional items for this month. The ongoing articles will continue to focus on the tables within an Access database.
Using tables for drop down lists?
The tables within an Access database are used to store all the database information. This is the fundamental purpose for all the data within the database. But what other reasons would there be to store other components of the database?
Throughout most databases, there are choices for drop down lists in forms. For example, a customer table will store a field such as a state within the United States. Another example would be a specific product that a company is selling or manufacturing or another example would be a table to store employees, etc.. There is an option in a form called a value list, but to better manage the choices, a separate table should be used to store the specific items that are contained in the list.
To ensure that each record has the proper value, the table of options should be the primary source of the value. You would not want the end user to “make up” values on the fly as this could lead to entering inconsistent values for whatever the reason.
The employee table as noted below may have the following design.
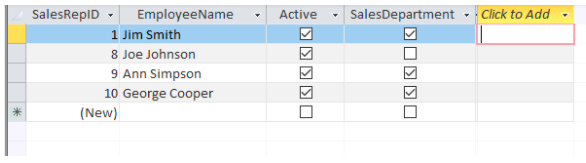
As noted, it makes sense to set the status of each employee to “Active” as these are the employees that will be included in the drop-down list. By not deleting them, then they are still available for future use.
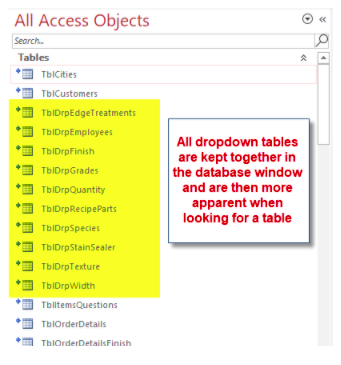
Tip – Naming the actual dropdown list table a proper way can be helpful. For example, naming all tables for drop down lists starting with “TblDrp……” will store them all together in the database window as noted in the below figure:
Validation of data when entering data into the database at the table level
Along with drop down tables forcing accurate data into tables, another method within the table itself is setting a validation rule. This is done in the design of the table inside the field properties itself.
For example, to make sure an accurate shipping date in the future is entered, you can use a validation rule to control this by doing the following.
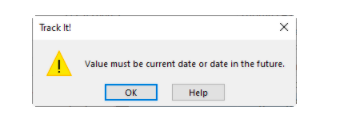
Validation Rule:[ShippedDate] >=Date()
Validation Text: The shipping date must be the current date or a date in the future.
See the figure below

When the validation rule is “broken”, then the following message appears. See below figure.
These are just a few time saving tips when using Access tables. If you are having trouble knowing how to get started with Microsoft Access, reach out to Arkware today for any database needs.
by John Campbell | Mar 11, 2021 | MS Access
In our previous blog, we highlighted some tips and tricks within Microsoft Access. In this article, we highlight some additional tips and tricks when using Access forms. The below features are available in Access 2016 and higher.
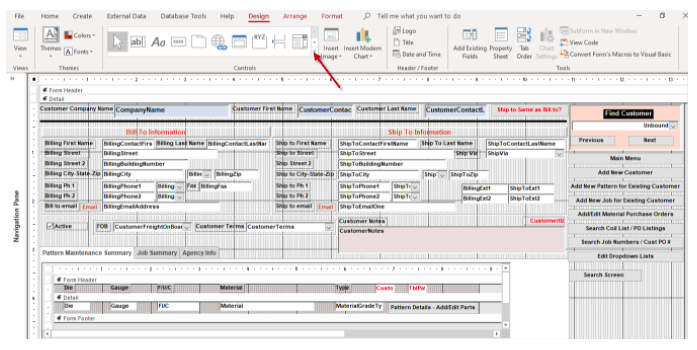
Viewing a form in Layout View
When using Access forms, the user tends to either be in the “Form View” or “Design View”. The design view allows for physical layout changes of the form. The form view is primarily used to enter data or run reports via command buttons.
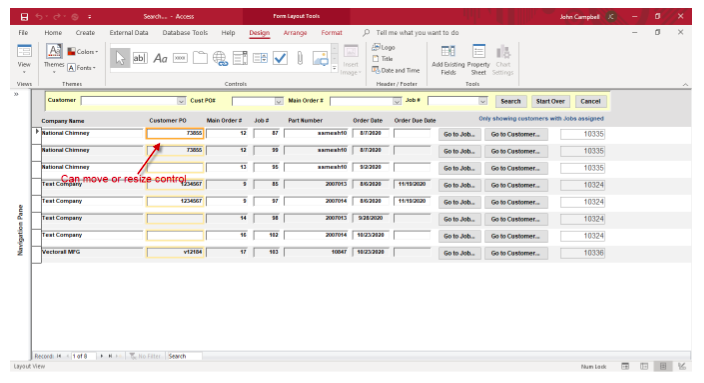
However, there is another viewing option within Access called the “Layout View”. The layout view is only available for use with tabular forms. The tabular view is a combination of design and form view. As noted in Figure 1, a nice option is that the user can select a form control while seeing the actual data. The user can then resize or move a control while viewing actual live data. This saves time by not having to keep switching between the form view and design view.
Figure 1
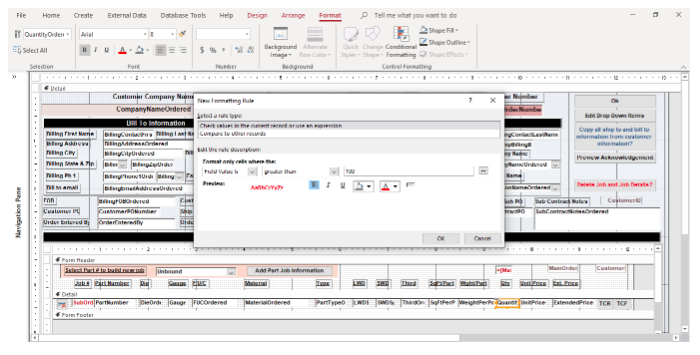
Conditional Formatting Option
Conditional formatting is often dominated in use in Microsoft Excel. However, Microsoft Access also has this feature within Access forms and reports. The idea behind conditional formatting is that a field or fields meets some condition(s) and then some sort of formatting can be done on the control.
For example, in Figure 2, if the quantity field in the form is greater than 100, the control color would be set to bold with the color red. Another option, and there are several, is if the field has the focus on the form, the background color can be changed to a certain background color. This condition is beneficial when tabbing through a form to know which field has the focus.
Figure 2
Setting the Default Formatting for a Specific Control
Changing form control formatting can be time consuming. When creating form after form, you may tend to use the same formatting features. Access has default settings, but these are set at the program level. Altering the field properties may involve making many changes to that specific control. Having to do this repeatedly, can be time consuming if the form has several controls to change.
An option buried in the formatting bar as noted in Figure 3 is the “Set Control Defaults” option. The process to use this feature is first formatting a control to the way the user wants it to look. For example, you may want to have a field that has the sunken affect, using the arial font and is bold.
Once the control is formatted the way the user desires, select the control and then select the “Set Control Defaults” option. Then, going forward all field controls that are added to the form are then formatted in the with the same features, reducing the steps of formatting itself.
Figure 3
These are just a few time saving tips when using Access Forms. If you are having trouble knowing how to get started with Microsoft Access, reach out to Arkware today for any database needs.